UI Prototyping with Quartz Composer and Origami
March 15, 2014
When working on my first app, I didn’t have any idea on what a proper workflow was. I designed the entire app using Sketch, but since a significant part of the interface was made up of animations triggered by touch events, I didn’t have any way to visualize and time the effects during the initial phase. Instead, I created the interface programatically and tested each animation, tweaking them constantly until I was happy with the end result. It was definitely the hard way to do it and it took over a month (working only on weekends) to figure out what gestures and effects I was happy with.
I had come across a blog post or two that suggested using Quartz Composer (henceforth mentioned as ‘QC’) but since the documentation and literature surrounding it was sparse, I found it hard to get in to and eventually refrained from using it. Additionally, QC hasn’t received much love from Apple (the last updates were circa 2007) and I didn’t want to spend any time learning software that seemed on its way out.
Soon after that however, Julie Zhuo, a designer at Facebook, wrote about how QC was crucial to their workflow when working on Facebook Home. Zhuo agreed that Quartz Composer had a bit of a learning curve and was fairl cumbersome so her team had taken some steps to make it easier to use. The culmination of this effort was Origami, which they recently released to the public. Origami is simply a toolkit for Quartz Composer that makes interactive design prototyping easier.
Since QC apparently has enough functionality to suit the needs of a much more complex app than mine, I decided to give it a try. I’ve attempted to put together what I’ve learned during the process into this blog post to help give others a good starting point with QC and Origami. Once you get the hang out it, QC is not at all complicated to work with. There are definitely a few disadvantages, but before we get into all of that, let’s start at the top.
What is Quartz Composer?
Quartz Composer is a node based visual programming language thats part of the Xcode development environment and is used for processing and rendering graphical data. In the Quartz Editor, a user creates a composition by connecting a number of patches to one another with noodles.
QC’s original purpose was for visualization tasks so basic patches include things like color mixer, gradient and dissolve transitions. Using these patches, the end result of the composition and any changes made are immediately visible in a Viewer making it a great tool for quickly creating prototypes.
Origami extends QC’s functionality by including a number of new patches that make it easy to carry out common mobile interactions out of the box such as clicking, tapping, dragging, and scrolling. You can also create classic animations, bouncy animations and transitions - all stuff that is fairly complicated using any of QC’s built in patches. Finally Origami also fixes few of QC’s long standing bugs.
Let’s work through an example so it’s easier to understand how QC + Origami shines. For the purpose of this tutorial we’re going to implement a radial menu similar to Path’s that spins out with menu options when the user taps the button.
To follow along with this tutorial, you can download the assets I use.
Installing QC & Origami
To get started, you need to first register as an Apple Developer on their developer portal. It’s free and lets you download the Xcode graphic tools of which Quartz Composer is a part of.
Once registered head over to the Downloads for Apple Developers section of the Apple Developer’s site. Look for Graphic Tools for Xcode, download and install.
After installing Quartz Composer, download and install Origami and you’re all set.
Creating a Composition
QC has a few different templates for different types of visualization tasks. We’re going to use the Basic Composition which is an empty template that clears the screen every frame. Go to File > New from Template or Cmd+N.
Your window should look like this:
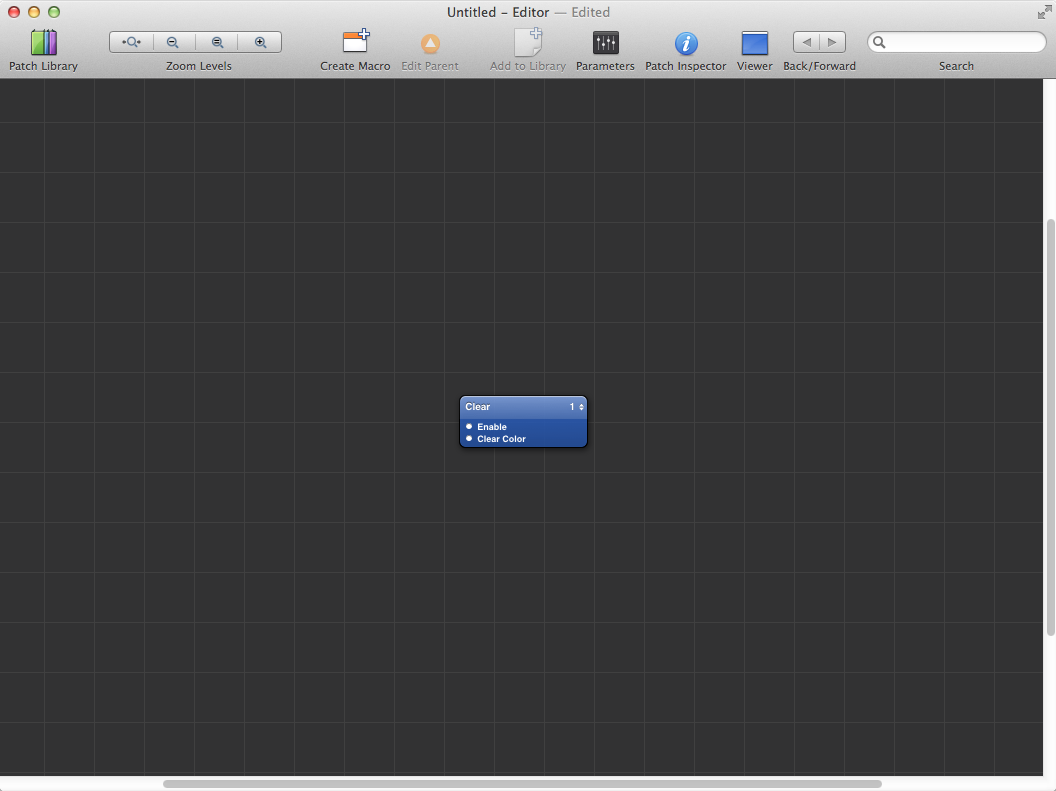
The blue box that you see is a Quartz Composer patch, specifically a Clear patch. According to the documentation:
patches are base processing units that execute and produce a result in a visual programming environment.
The circles on the left of the patch (alongside the terms Enable and Clear Color) represent ports on a patch, with input ports on the left and output ports on the right. Ports are akin to parameters in a function, they pass data in for a patch to execute. As we walk through building our first prototype, you will see that not all patches have input or output ports. There’s a lot more to patches than I’m covering, but that knowledge is beyond our needs. If you want to learn about the nitty gritty, the Apple docs are your best friend as always.
Quartz Composer continuously renders the contents of the composition in a Viewer (which can be accessed by clicking the icon labelled Viewer in the toolbar). We are going to leave the Clear patch in because it is usually the first rendering operation that a composition should perform.
With its default patches, we would have to do all sorts of crazy stuff just to get an iPhone set up in the viewer but Origami does this out of the box. If you don’t already have the Patch Library dialog open, click the icon in the top left corner of the window (the first icon in the toolbar). Search for the Phone patch and drag it into the composition window. You can see that this immediately renders an iPhone in the Viewer window.

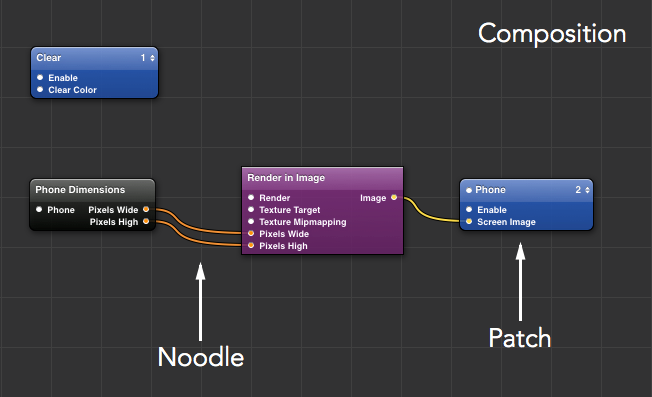
Next we need to set the dimensions of our iPhone screen. This ensures that any artwork that we export will fit perfectly in the viewer. Search for and drag in first the Phone Dimensions patch, followed by the Render in Image patch. The Phone Dimensions patch is an Origami patch that outputs the pixel width and height of the phone that we’re designing for. The default is set to iPhone but you can change that. Select the patch and click on Patch Inspector in the toolbar. This is how you access the parameters of a patch. The Phone Dimensions patch has only one parameter - the type of phone you will be using. Leave iPhone selected.
The Render in Patch on the other hand is a patch that renders all of its subpatches into an image. We need to specify that the image rendered matches the phone dimensions and that it outputs this image to the iPhone in our viewer. To do this click and drag from the Pixels Wide output port of the Phone Dimensions patch to the Pixels Wide input port of the Render in Image patch. It should look like this:
![]()
This is essentially how Quartz Composer works as a visual programming language. You connect from the output port of one patch to the input port of another and it evaluates based on your directions. This resulting composition is rendered to the viewer.
Go ahead and connect Pixels Wide of the Phone Dimensions patch to Pixels Wide of the Render in Image patch. Next we need to make sure this rendered image is visible in our phone. Connect the Image output port of the Render in Image patch to the Screen Image input port of the Phone patch. It’s okay if your viewer doesn’t change at all because we don’t have anything in our Render in Image patch yet.
Creating Our Rendered Image
Let’s start adding our designs to QC so that we can start protoyping. Origami makes this easy by letting you drag in an image into your composition window. Start by double clicking on the Render in Image patch to create your subpatches.
Once you have the necessary assets, drag in the BaseScreen.png file. If you have your Viewer up, you will immediately notice that the phone screen goes all crazy. Don’t be alarmed this is expected behavior. If you remember, in our parent composition, we had a Clear patch as our starting point. This patch basically helps us reset the composition so that everytime a new patch is added, Clear is run first, the composition is reset and re-rendered. Delete all patches that are in the composition, drag the Clear patch in, and bring in the same BaseScreen.png image as before. Voila!
Dragging the image in creates an Image patch and an associated layer. This layer patch has many input ports that control all sorts of properties. Don’t be confused - as we walk through the rest of the tutorial, you will gain a better understanding of what these properties do as we use them. Go ahead and add the rest of the assets into our composition.
Quartz Composer Coordinates
When you drag the images into the composition, you will notice that they are positioned exactly in the center of the view. The phone dimensions patch we added set the dimensions of the rendered image to match that of an iPhone (1136 x 640 pixels) so you would expect the image we just added to be positioned right in the center at (320,568), instead the images are at (0,0). This is because QC has a different coordinate system (as compared to iOS or OS X). QC uses a three-dimensional coordinate system with the origin at the center like below:
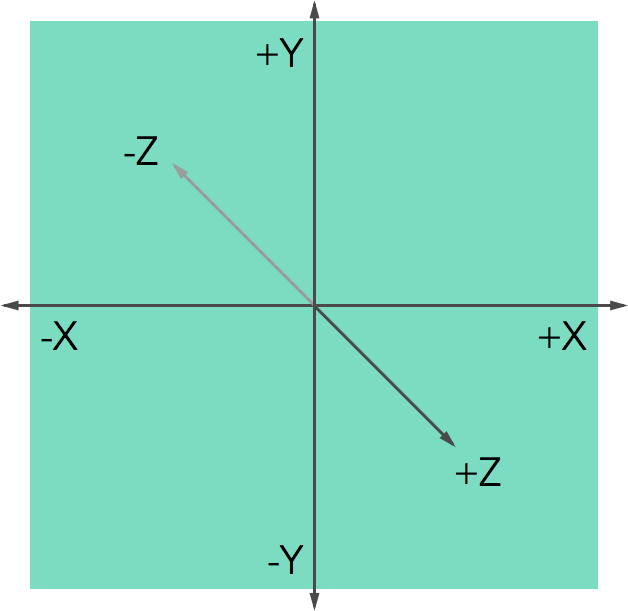
Given this coordinate system, the height of the rendered image goes from +580 to -580, while the width goes from +320 to -320. With this in mind, we can move our images to their desired positions. To set the coordinates, click on a layer, and click on Patch Inspector in the toolbar. We will be setting the X and Y positions of each layer.
- Add button: (0, -512)
- A button: (-184.5,-408.5)
- B button: (0,-298.5)
- C button: (184.5, -408.5)
The final position should look like this:
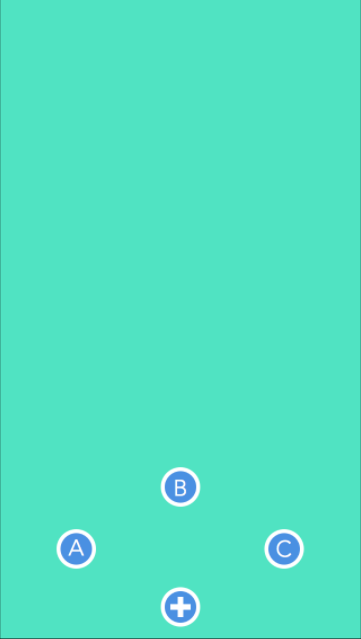
These positions are the final positions of our radial menu. For the purposes of our animation, the lettered button images are all going to sit underneath the Add button layer and animate to these final positions.
Let’s move them to their initial positions so we can get started with our animations. Change the coordinates of all the lettered buttons to match that of the Add button. Depending on the order you dragged the images in, you may notice that the Add button is not the top most layer (in my case, the C button sits on top). Each billboard patch (the blue patch connected to the image patches) has a layer number on the top right corner. Change the layer number of the Add button to the highest number (6 in my case). You can rearrange all your layers using these layer ordering numbers.
Animating Our UI
The first thing I need to set up is to ‘fan out’ the lettered numbers when I click on the Add button.
- Let’s drag in a Hit Area patch and make sure the Setup Mode box is checked.
- Set the Anchor Point to Center, Y Position to -512 and the Width and Height to 80.
- Next drag in a Interaction 2 patch and connect it to the Hit Area patch (drag from the Interaction to the Hit Area patch).
With these two patches, we’re setting it so that when a certain type of interaction, either a click, tap or drag is initiated within our designated hit area, the animation sequence begins.
If we click on the Add button now, nothing happens. This is because we haven’t told our composition what to do once the interaction has begun.
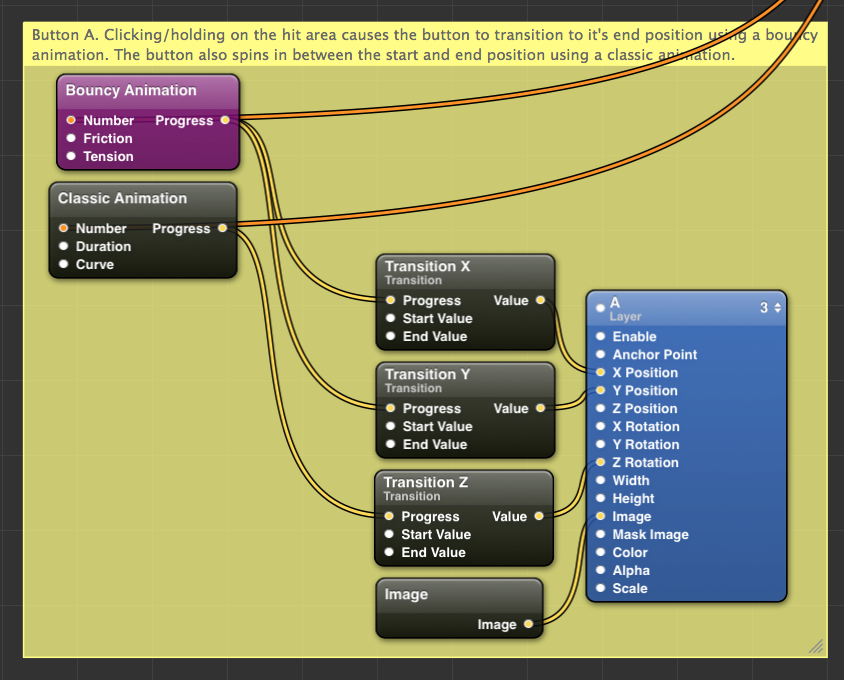
- First, let’s animate the A button to move to the end position. We also want it to bounce slightly at the end like the Path radial menu buttons.
- Drag in a Bouncy Animation patch and two Transition patches.
- Rename one of the Transition patches “Transition X” and the other “Transition Y” for clarity. When the Add button is pressed, the A button moves diagonally to its end position, meaning that we need to change both the X and Y position.
The Transition patch takes a number in a range of 0 to 1 and converts it to a range starting with a Start Value and End Value. Our Transition X patch is going to control the transition of the X position of our A button . When the A button is ‘under’ the Add button, the X value is 0 and when it moves to its final position the value is -184.5.
- Select the Transition X patch and click on Patch Inspector (in the toolbar) to access its properties.
- Leave the Start Value at 0 and set the end value at -184.5.
- Now we need to connect this patch to the X position of the A button to let it control the transition. Click and drag from the Value output port of the Transition X patch to the X Position input port on the A patch.
Clicking the Add button in the Viewer still doesn’t do anything and that’s because we haven’t connected our button press interaction to the animation.
- Select and drag from the Drag output port of the Interaction 2 patch to the Number input port on the Bouncy Animation patch.
Similar to the Transition patch the Bouncy Animation takes an input between 0 and 1 and animations a property in between.
- We want to connect the progress from 0 to 1 of our Bouncy Animation patch to the Transition patch so let’s go ahead and connect the Progress output port from the Bouncy Animation patch to the Progress input port of the Transition X patch.
In the Viewer, click and hold on the Add button and you’ll see that the A button moves smoothly to the left. I want it to move faster and bounce a lot more at the end so I’m going to tweak some of the Bouncy Animation properties.
- Change the Friction to 7 and the Tension to 200 and give it a whirl.
Looks good!
Let’s add a couple more steps:
- On the Transition Y patch, set the Start Value to -512 and the End Value to - 408.5. Connect from Bouncy Animation - Progress to Transition Y - Progress and finally from Transition Y - Value to A Layer - Y Position.
- Drag in a Bouncy Animation patch and rename it Bouncy Animation B. Connect from Interaction 2 - Drag to Bouncy Animation B - Number. Set Friction to 7 and Tension to 200.
- Drag in a Transition patch and label it Transition Y. Place it beside the B button image patch. Set the Start Value -512 and the End Value at -298.5. Connect from Bouncy Animation - Progress to Transition Y - Progress and from Transition Y - Value to B Layer - Y Position.
- Drag in another Bouncy Animation patch and rename it Bouncy Animation C. Connect from Interaction 2 - Drag to Bouncy Animation C - Number. Set Friction to 7 and Tension to 200.
- Drag in two Transition patches and label them Transition X and Transition Y. Place them beside the C button Image patch. On the Transition X patch, set the Start Value to 0 and the End Value to 184.5. On the Transition Y patch, set the Start Value to -512 and the End Value to -408.5. Connect from Bouncy Animation C - Progress to Transition X - Progress as well as Transition Y - Progress. Finally connect from Transition X - Value to C Layer - X Position and Transition Y - Value to C Layer - Y Position.
Click and hold to see the magic! We could leave it at this, but we only need to make a few more tweaks to make it more Path-like. If you look back at the Path radial menu gif above, you’ll notice that after tapping the Add buton, the menu options spin while transitioning and that they don’t all fan out together. There is a slight delay between each subsequent menu option transitioning to its end position. It will only take a few more patches to make this happen.
Spinning
To make our menu buttons spin all we need to do is modify the Z position of the corresponding image patches. To accomplish this:
- Drag in a Classic Animation patch and a Transition patch. Label this Transition patch “Transition Z”. Connect from Interaction 2 - Drag to Classic Animation - Number to start the animation once we tap the Add button.
- Similar to the Bouncy Animation, connect from Classic Animation - Progress to Transition Z - Progress.
- Change the Start Value of Transition Z to 500, leaving the End Value at 0 and connect from Transition Z - Value to A Layer - Z Rotation (make sure it’s rotation and not position).
The A button should now be spinning merrily! Go ahead and add this behavior to the B and C buttons as well. I’ll wait :)
Delayed Transitioning
To get that delayed fanning effect that the Path menu has, we don’t need to bring in any additional patches, just tweak some existing ones. Let’s go back to our Bouncy Animation patches. Origami has minimal documentation for the custom patches it introduces, but since there are only two input parameters, it’s easy to figure out what they do. The Friction parameter controls the bounce effect. Low values increase the bounce of our button while higher values decrease the bounce. We don’t want to change our bounciness so let’s play around with the other parameter.
The Tension parameter controls how fast it animates between its start and end positions; the higher the value the faster it moves. If we decrease the Tension values for the B and C buttons, we should get the delayed fanning out effect that we want.
- Change the tension on the Bouncy Animation patch for the B Layer to 100 and for the C Layer to 50.
You should have a spinning, fanning out radial menu just like Path’s (sort of). Play with it in the viewer!
There’s still a few improvements we can make, but you should be able to do that on your own.

Conclusions
There you have it - our first QC Composition! Using QC, I was able to quickly (~10 mins) prototype my UI until I had a basic radial menu. Had I tried to do this in code for the first time around, it would have taken much longer.
Hopefully this tutorial should give you a quick intro into the different kinds of things you can do with Quartz Composer. There is a bit of a learning curve but I don’t think it’s overly complicated and it’s mostly understanding what patches you need to include to get the desired functionality.
The only downside that I see right now to using Quartz Composer is that if you’re protoyping something complex, your composition can get unweildy and convoluted fairly quickly. In just creating a radial menu with three buttons we have over 20 patches in our composition. This can be mitigated to some effect by rearranging and using QC’s notes feature. I’ve grouped all the patches related to button A and placed a note underneath it to indicate what that grouping achieves. Notes can be created by right clicking anywhere in the composition window.
After a bit of rearranging, my final composition window looks something like this:
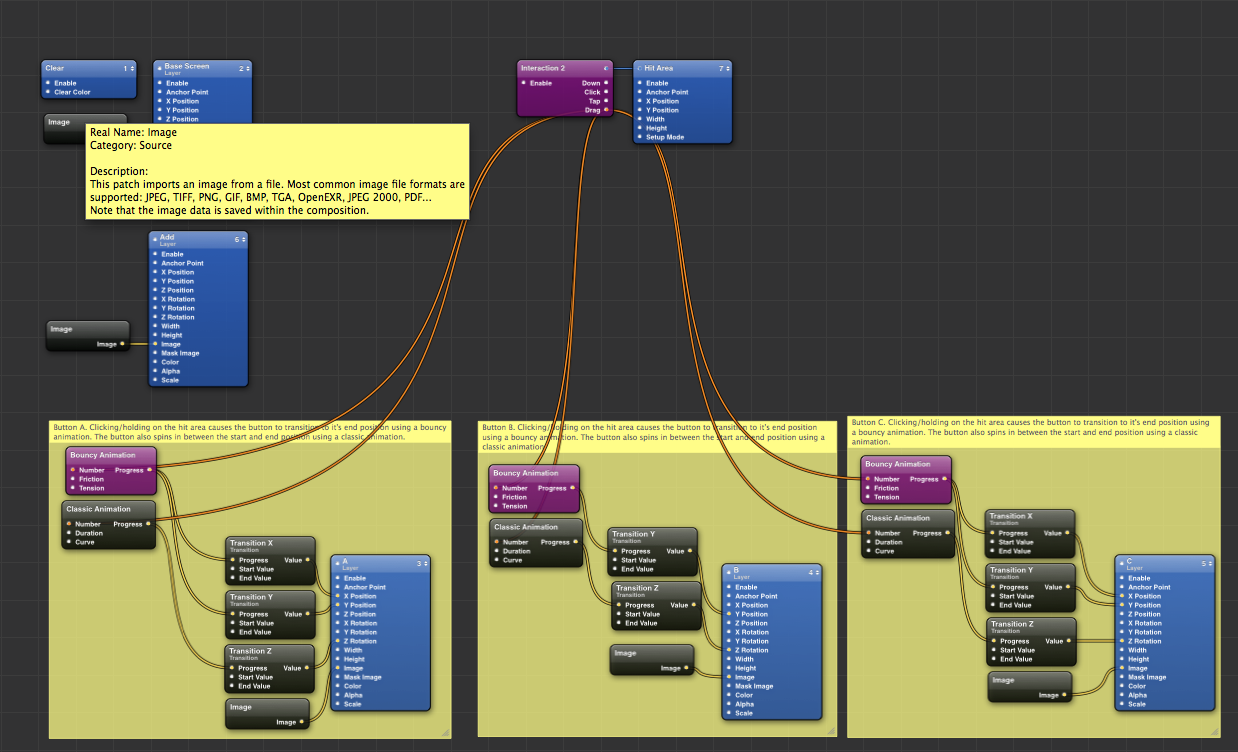
As you can see, anything more complex and things can get messy real quick.
Resources
If you want to dig deeper and learn more about using QC for prototyping, here’s some links to get you started:
- Introducing Origami for Quartz Composer
- Prototyping with Facebook Origami by Jay Thrash
- Prototyping 101 - Quartz Composer
Once you have the basics down, read Learning to Build Abstractions in Quartz Composer by Shawn Moore.
Other Prototyping Tools
If QC isn’t your cup of tea, try out some of the other tools available:
And finally here’s the link to download the final composition file.